- Terminology
- Gathering Outbreak Information
- Obtaining Your Results
- Understanding The Program Output
- Picking A Path
- Following the Path - Basic Techniques
- A (Aggressive) Steps
- B (Skittish) Steps
- O (Oblivious) Steps
- S (Scare) Steps
- G (Ghost) Steps
- CR (Clear Remaining) Step
- Other Notes about Removing Pokémon
- Example Skittish Pathology
- Paths with Multiple Shinies
- Advanced Technique: Scaring
- More Information
- Credits
This guide was originally written by Elvis (@notfake_elvis on Discord server Shiny Hunters Anonymous) with help from Anubis (@Sibuna_Switch on Twitter) and edited by Denvoros (@denvoros) for this website. Additional credits are at the end of the guide.
Pokémon Legends: Arceus features Mass Outbreaks and Massive Mass outbreaks, which infests areas with a decent number of Pokémon from the same family. Players quickly determined that using different actions in different combinations to complete an outbreak gives different results. These different combinations are called "permutations" (you can read more about it on the RotomLabs guide to regular Outbreak hunting). Additional research went into investigating how those permutations can predictably spawn shiny Pokémon, which you can take advantage of through a process called "Random Number Generator (RNG) manipulation."
This guide will teach you how you can use this RNG manipulation with the permutations to shiny hunt in Mass Outbreaks and Massive Mass Outbreaks.
An important note regarding community standards, you should note that this guide will require the use of a Discord bot that you show your Pokémon to. You won't need to do any hacking on your end, but some players might consider even using tools like these as cheating, so be sure to check with any community rules before offering these Pokémon for trade.
Also, you can hunt all Pokémon in these outbreaks with these methods. However, "skittish" Pokémon are much more difficult and require more advanced methods. It is recommended that you first try this with an aggressive species to understand the method. Check our tool that indicates what species are considered "aggressive".
Terminology
- "Permutation": A series of actions to perform on the Outbreak
- "RNG": Short for Random Number Generator/Generation, or, more generally, the entire system the games use to create a "random" Pokémon
- "Aggressive Pokémon": These are Pokémon that you can get into a multi-battle with to make the permutations easily
- "Skittish Pokémon": These are Pokémon that cannot get into a muti-battle, they typically run away (i.e. Abra, Bonsly, Petilil)
- "Multi-battle": When two or more Pokémon can enter and remain in a battle in Pokémon Legends: Arceus
- "Path": The selected series of actions to perform to get your target
Gathering Outbreak Information
To get started, you’ll need to get information related to your outbreak so the bot can properly calculate your permutations.
Before You Start
- Disable auto-save in the Settings (go double check!).
- Recommended: Clear Pasture 1 (the box storage) completely so anything you catch goes there in the order caught. Otherwise, they might end up scattered among your boxes!
Getting the First Four Pokémon
- Find a Mass Outbreak or a Massive Mass Outbreak.
- Save at a camp before approaching the outbreak. Remember that you will always be able to retry from here if you make a mistake (plus we will want to return to this point once we know our path!).
- Optional: You can also save in Jubilife Village before going to an area if you wanted to go for multiple Mass Outbreaks or Massive Mass Outbreaks.
- Go to the outbreak.
- Catch the first four Pokémon in the outbreak that were already there when you first arrived. They must be the first four and they must be part of the outbreak. This is required for the program to get your "group seed" which will be used later. It does not matter whether they are shiny, alpha, or a different species.
- If the Pokémon are aggressive, it is recommended that you "multi-battle" them and catch them all within the battle to avoid accidentally losing track of which were the first four.
- If you mix up the Pokémon from the first four with any additional spawns, the next steps will fail.
- Count the number of Pokémon in the rest of the outbreak. This includes any second-wave spawns if a Massive Mass Outbreak has a bonus wave.
- This can be done through battling or catching. Catching is recommended because you can also count from your boxes.
- Be sure you keep track of any skittish Pokémon that despawn.
Remember that you must not save after step 2. Once you have shown your information to the bot and calculated your paths, you will reset to your save at the camp or Jubilife Village.
What you Should Have By This Point
Make sure you have the following information by this step:
- Species in the first wave (the icon on the map)
- Total number of Pokémon in the first wave
- Species in the second wave (the icon on the map, also make sure you know if they're all alphas)
- Total number of Pokémon in the second wave
- The map or region this outbreak took place in.
For example, here's what you might have for a Massive Mass Outbreak with one wave:
- Species: Ralts
- Total number in 1st wave: 8
- Second Wave Species: Kirlia (all Alpha)
- Total number in 2nd wave: 6
- Region: Alabaster Icelands
Obtaining Your Results
Once you have completed the checklist above and have captured the first four Pokémon of your outbreak, you will need to use one of the bots provided by RotomLabs (here's a link to the Discord) or Shiny Hunters Anonymous (here's a link to their Discord) and follow the following steps.
Getting Your Paths
- Head to the trading post in Jubilife Village and begin a trade by searching for someone far away.
- Enter one of the chats in the Discord server and type the command
$ed. The bot will DM you a code to use in the trade you will start in step 1. - Once you meet the bot, just show it the first four Pokémon from your outbreak. Showing the bot just requires moving your cursor over the first four (which is why we recommend having these Pokémon in the first box). The bot will confirm seeing each one as you show it and the final results will look something like this:
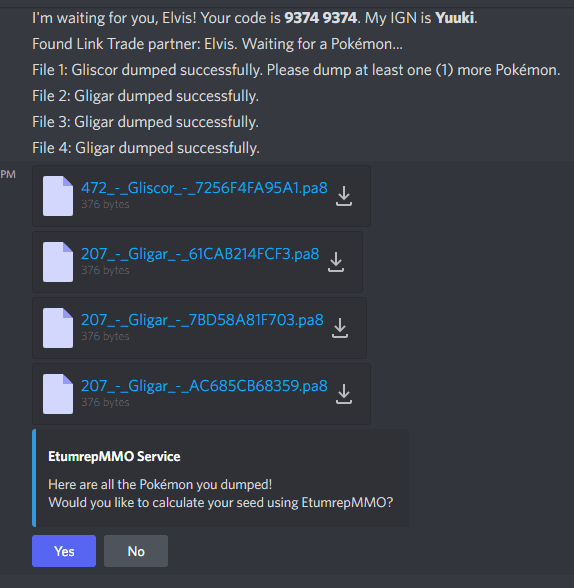 This screenshot of a Discord DM illustrates what kind of output you can expect from the bot, it includes the dumped files from the bot as well as options to start the process of getting your seed and your shiny paths.
After getting the DMs follow these steps:
- Once you have shown the bot all four Pokémon, it will ask you if you would like to calculate your seed. Be sure to press "Yes" to continue. After a few seconds, the bot will return the seed. Press "Yes" to continue calculating your path.
- From the dropdown box, select what type of paths you want the bot to look for. You can select "Shiny" for all shinies, "Shiny AND Alpha" for only Shiny Alpha paths, and "Alpha" for all Alpha paths (including non-shinies!).
- Next click the "this link" blue highlighted link to configure the JSON text needed for the final results. On that webpage, you should fill out the information you gathered in the steps above. NOTE: if you do not have a second wave, just leave the second wave info blank with 0 spawns. Finally, click "Copy to Clipboard" to copy the text.
- Finally, head back to your Discord DMs with the bot, and click "Ready." A dialogue box will pop up. Paste in the JSON information that you just copied and press "Submit." Then, the bot will send your paths in the form of a
.txtfile. This file can be read in Discord, but it is recommended to download it and open with Notepad or another editor on your computer/phone.
Understanding The Program Output
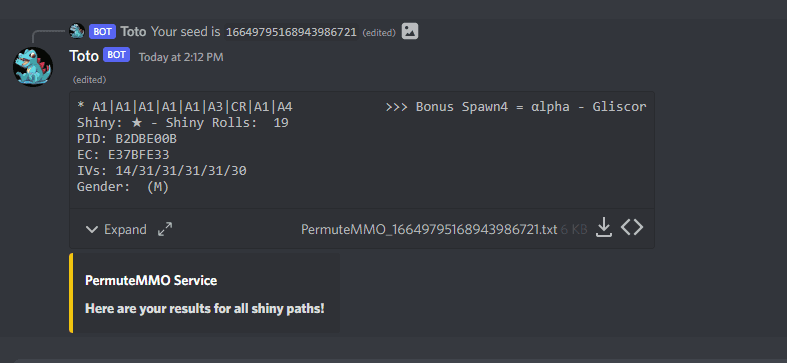
The program will spit out a bunch of lines that look like the following image:

At the very top, you'll see your seed. This seed is a value that the game uses to determine everything about an outbreak. You will have gotten this from a previous step, and it is repeated for convenience.
Let's take a look at the path in the green box:
A1|A1|A3|G2|G1|CR >>> Bonus Spawn4 = α-Yanma (M): 12 * 32/02/31/29/31/31 Adamant
The first part (A1|A1|A3|G2|G1|CR) is the path. For paths, there will be letters and a number. The number refers to how many you will have to clear in each step at the same time or within the same battle. The letters refer to different actions you will have to take. "A" is aggressive, "G" is ghost, "S" is scare, "B" is to remove skittish plus aggressives, "O" is for oblivious, and CR means to clear the remaining Pokémon. More details about how to perform these steps is found below.
After the >>> is when you will see the exact point in the Outbreak that the spawn happens. Bonus means it will only occur in the second wave.
Then there's the species and if it's an alpha spawn. A species preceded by α- means it will be an alpha. If that is missing, then it is non-alpha.
In parentheses, you will see the gender of the Pokémon, if it has one. In our case, M means that the Yanma will be male.
The number after the species (in this case 12) tells you how many shiny rolls you need on the species for it to be shiny. The symbol after is the shiny type (star vs. square). The * indicates star shiny for this Yanma.
Then you will get the Pokémon's stats and nature, followed by any additional comments the program notices about the spawn. Additional comments might include if it is part of a chain, if there are multiple shinies, or if you need to do special steps.
More information about each of these parts is detailed throughout the rest of the guide.
Picking A Path
Now, you'll need to pick a path. There are a few things to consider. First, make sure that you have enough shiny rolls for the path. Second, pick a path that is doable for your target. All output paths are possible, but some are much easier than others.
Shiny Rolls
Think of shiny rolls as the number of times the game attempts to see if a Pokémon is shiny. If the path requires more rolls than you have, the Pokémon will not be shiny. In Pokémon Legends: Arceus, shiny roll bonuses depend on a number of factors like Pokémon completion, type of outbreak, and if you have the Shiny Charm item.
If you are unsure how many shiny rolls you have for a given species (and each species will have different rolls), you can look it up in the following locations:
- Our sister website
- Anubis's original shiny rates table
- A Chinese guide: 宝可梦传说:阿尔迪斯 寻找闪亮神奇宝贝几率: link
Easy Paths
Which path should you pick? Easier paths usually have the following features:
- Single advances (clear one at a time).
- Few ghost ("G") steps (these are not necessarily hard, but take more time to do).
- Scare ("S") steps of length 2 only or with low difficulty tier species. (Scaring 3 or more steps covered below, these are advanced scaring steps)
Sample Easy Path
Here's an easy example path for a Yanma output by the program:
A1|A1|A3|G2|G1|CR >>> Bonus Spawn4 = α-Yanma (M): 12 * 32/02/31/29/31/31
Notice how this path is a single advance, then a single advance, then a triple advance, then a double ghost, then a single ghost. We'll explain those steps in depth, but this one is quite easy to do!
Sample Hard Path
Here's a difficult Mime Jr. path output by the program:
A1|A1|A1|S2|S3|G1|CR|A4 >>> Bonus Spawn4 = α-MimeJr. (M): 4 * 31/03/31/31/31/08
This path has a few single advances, but then requires two separate scare paths! That is much more difficult to perform. When getting your output, be on the lookout for easier paths than others.
Square vs. Star Shiny
Sword and Shield have star and square shinies. The difference is only visual when the Pokémon enters a battle. If a future game is released with the same star/square shiny mechanic (none have as of writing this guide), then Pokémon moved to those games will have that shiny type. For now, this has no effect in LA since LA has only one shiny animation. In this example you can see the program outputting stars and squares to show you the difference.
Following the Path - Basic Techniques
Here's a full breakdown of what your path could include. The Yanma path is included so you have a reference as well.
A1|A1|A3|G2|G1|CR >>> Bonus Spawn4 = α-Yanma (M): 12 * 32/02/31/29/31/31 Adamant
A (Aggressive) Steps
A means to remove aggressive Pokémon. You can do this by battling or catching. This is followed by the number to remove. A2, A3, and A4 mean you have to multi-battle since you cannot capture more than one at a time. The first 3 steps of the example path can be broken down like so:
- A1 = remove 1 Yanma
- A1 = remove 1 Yanma
- A3 = remove 3 Yanma in a multi-battle
B (Skittish) Steps
B means to remove skittish Pokémon plus aggressives. A B1 means to remove 1 skittish Pokémon. A B3 means to remove 1 skittish Pokémon and 2 aggressive Pokémon in a multi-battle. Some ways to start a B multi-battle:
- Throw your Pokémon at the skittish Pokémon while the aggressive Pokémon are either targeting you or stunned.
- If your aggressive Pokémon is an alpha, drawing its attention can cause it to roar and despawn the skittish Pokémon. One way to get around this is to stun all the skittish Pokémon and then draw the aggressive Pokémon’s attention before starting a battle.
- You can see a few examples of starting a B2 and B3 here thanks to Natu and Anubis.
There are no B steps in the example Yanma path.
O (Oblivious) Steps
O means to remove oblivious Pokémon. This applies to Mr. Mime, Magikarp, and Lickitung line since they are skittish and do not scare. Cyndaquil and Hippopotas do scare, but are treated as oblivious since only one at any time will run away.
An O1 means to remove one oblivious Pokémon. An O3 means to remove 1 oblivious Pokémon and 2 aggressive Pokémon in a multi-battle. This is similar to a B step other than involving oblivious Pokémon instead of skittish Pokémon.
S (Scare) Steps
S means to scare a certain number of skittish Pokémon. This is covered in the advance section of the guide.
G (Ghost) Steps
G means to perform a ghost spawn step. You should not see any G steps until you are down to your final 4 Pokémon in the wave. Here’s an example of how to do a G2:
- Remove 2 Pokémon. You can battle them, capture them, or multi-battle – all will work.
- Travel at least 120 meters away from the outbreak.
- Set a flag on the outbreak on the map to see how far you are.
- You can fast travel to the farthest camp and then return to the outbreak.
- You can also walk, run, or fly away; make sure the flag marker reads at least 120.
In the example path, there is a G2|G1. You would simply repeat the above steps each time; remove 2 Yanma and travel far away, then return and remove 1 Yanma and travel far away.
If when performing a G step another Pokémon spawns, it means you miscounted somewhere and will need to restart your path since G steps only include the last 4 Pokémon in the first wave.
CR (Clear Remaining) Step
This is a command to clear remaining Pokémon to begin the bonus wave. You can do this with any method you want as long as you do not leave the area. A Mass Outbreak or a single-wave Massive Mass Outbreak without a bonus round would not have this option.
Because CR is the final value in the first path, one can see that the 4th Pokémon to spawn in the bonus round is predicted to be a shiny alpha Yanma. As you can see in the image below, that was in fact the case:
Other Notes about Removing Pokémon
- If you enter a battle with more Pokémon than you need to remove, you can run away after you have removed enough.
- A Pokémon that runs away by itself in or outside of battle is still considered to have been removed. This is the same as if you had KO’d it or caught it.
- Pokémon that run outside of battle are usually the same as a B1.
- Pokémon that run in battle can be included in multiple removals such as B3 or A2.
Example Skittish Pathology
Here's an example: B2|A1|A2|G2|G1|CR
- B2: Defeat/catch 2 Pokémon in a multi-battle. This must be done with one skittish and one aggressive since the value is B2.
- A1: Defeat/catch 1 Pokémon.
- A2: Get into a multi-battle with 2 aggressive Pokémon; defeat/catch both.
- G2: Catch/defeat 2 Pokémon using any method (catch/battle one at a time or multi; doesn’t matter). Then, leave the area and return to the outbreak.
- G1: Catch/defeat 1 Pokémon. Then, leave the area and return to the outbreak.
- CR: Catch/KO the remaining spawns until the bonus round starts.
For skittish species, PermuteMMO will only return any paths that are possible (not including scaring; more on that below). It tracks the number of aggressive Pokémon on the field (e.g. alpha or evolved species) to decide which later steps can be done.
Paths with Multiple Shinies
Due to the high chance of a Pokémon being shiny in a Massive Mass Outbreak, it is likely that some paths produce multiple shinies. PermuteMMO will mark any paths that can contain multiple shinies. There are two kinds of paths that can yield multiple shinies.
Chain Results
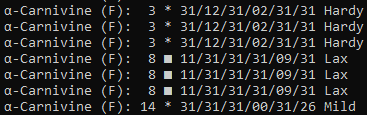
Chain results are labeled in the output. The arrows indicate steps from a path above it in the list.
 An example image of Voltorb chains including some alpha spawns.
In this example, completing A1|A2 will give you one shiny Voltorb. Continuing the chain with A3|CR gives you a second shiny alpha Voltorb. Continuing the chain once again with A2|A1 gives you a third shiny alpha Voltorb.
Multiple Results
Multiple results are also labeled in the output. They only occur when a batch of Pokémon spawn at once and several in that batch are shiny.
One example might be when a bonus wave of a Massive Mass Outbreak starts. Each time, 4 Pokémon are spawned onto the field at the same time.
In this example, clearing 3 or 4 Tangela at a time causes 2 shinies to appear at once when the next batch respawns.

Advanced Technique: Scaring
Skittish species have another option that starts with S. An S means to scare a certain number of skittish Pokémon and immediately fast travel to a camp 120+ m away to multi-despawn them.

The general method works like this:
- First, startle a group of skittish Pokémon at the same time, causing the “!” to pop up over their heads. You can do this by running up to them or throwing items to hit them.
- They will start to run away and the moment that the “!” disappears, open your map and fast travel far away (needs to be to a location at least 120 m away).
- The method of startling is different from species-to-species and will require some unique innovation to pull off. Experiment and find out what works!
For some visual examples of this method, check out the GIFs posted by Anubis here.
Other notes:
- The method will work even for Pokémon that run away, but do not have a “!” appear.
- Scatterbangs do not seem to work unless they hit a Pokémon; any item that hits a Pokémon with a “clonk” sound can work to startle them.
- Alphas of skittish species can scare other skittish alphas away. This can make it difficult to multi-battle them since aggroing them makes them roar.
- One way around this is to throw a smoke bomb nearby and run around inside so all of them notice you with a “...” above their heads. Dash out of the smoke cloud so that all of them become aggressive at once.
- Another way is to get very close and hop on Braviary until the “...” is above all their heads, then run towards them.
- Example videos can be seen here.
Scaring Difficulty Tier List
This table is a list of skittish species sorted by difficulty. Special thanks to the folks on the Shiny Hunters Anonymous Discord server for helping put together this list.
| Tier | Notes | Species |
|---|---|---|
| Easy | Good for beginners. These species tend to only run, or they may posture/pose and then run. | Ambipom, Bidoof, Blissey, Buneary, Chansey, Chatot, Chimchar, Chimecho, Chingling, Clefairy, Combee, Eevee, Glameow, Goomy, Kricketot, Munchlax, Petilil, Piplup, Ponyta, Ralts, Rowlet, Shellos, Snorunt, Spheal, Starly, Sudowoodo, Swinub, Teddiursa, Turtwig, Unown, Vulpix, Wurmple |
| Medium | Can be done with practice and luck. This includes species that are on water (thanks to maneuverability) as well as skittish species with a chance to attack. | Bonsly, Budew, Cherubi, Cleffa, Finneon, Froslass, Gardevoir, Happiny, Kirlia, Kricketune, Lopunny, Lumineon, Magby, Mantine, Mantyke, Mime Jr., Pachirisu, Pichu, Purugly, SLiggoo, Stantler, Togepi, Togetic |
| Hard | Difficult due to a combination of timing, terrain, and behavior quirks. Do not try these unless you're already comfortable with species in the Easy and Medium tiers. | Abra, Basculin, Misdreavus, Mismagius |
| Impossible | These are marked as "Oblivious" in PermuteMMO (and the output given by the bots) and are marked as "O" steps in their paths. These cannot be scared! | Cyndaquil, Hippopotas, Lickilicky, Lickitung, Magikarp, Mr. Mime |
More Information
If you get stuck, or get confused with any part of this method, feel free to reach out.There are lots of folks on the RotomLabs (here's a link) or Shiny Hunters Anonymous (here's a link) Discord servers that are happy to help!
Credits
Once again, a huge thank you to Anubis#2855, Koi#3088, Kuroneko#6019, Kurt#6024 and Denvoros#0001 for their contributions for making this all possible. Below is a quick summary of contributions:
- Thank you to Kurt and Anubis for developing the PermuteMMO and EtumrepMMO programs to find these paths.
- Thank you to Kuro for supplying the method to make EtumrepMMO able to solve seeds extremely quickly and for hosting the server that does these calculations.
- Thank you to Koi for developing the bot that removes the need for separate programs.
- Thank you to Denvoros for the website to help users format the JSON as well as helping summarize which species of Pokémon are skittish/aggressive.
- Thank you to Elvis for putting together this guide.